By using Traffic Shaping cFosSpeed continuously keeps track of the current line speed (receive and send). You can always switch on the line speed display in the Metro skin, so you see the bandwidth which was available for the last download and/or upload. To determine the current maximum speeds, you can download or upload a big file an see how these values change. So you alays stay informed about the current speed of your Internet connection.

We are currently working on a solution, so cFosSpeed conducts a measurement for the maximum connection speed automatically. Until then, the above method gives you a quick way to determine your bandwidth.

Switch speed display on/off

Speed display active

There are many different options for prioritizing a connection while it is currently running. For all of them, however, you need to right-click on your status window and click on Current Connections

Options

You can now choose whether you want to prioritize a connection, protocol or program temporarily, or permanently prioritize a protocol or program

Prioritizing a connection temporarily
Prioritizing a protocol temporarily
Prioritizing a programme temporarily
Prioritizing a protocol permanently
Prioritizing a programme permanently

Differentiated Services (DiffServ) is a Quality of Service (QoS) architecture. Usually, it is supported in closed domains (“DiffServ clouds”) like an organisation or a LAN. With DiffServ you can label each packet with a certain value (called Differentiated Services Code Point, DSCP) and that value is stored inside of the packet. So at the next hop of the packet, the value can be read and taken into account for further routing.

cfosSpeed supports for incoming packets (you can filter on the DSCP value) and on outgoing packets (you can set the DSCP value).

DiffServ labelling is useful in several scenarios:

  1. You have multiple machines that access the Internet and you use a router (boxed or Windows machine) to provide the connectivity to the Internet.
  2. You are part of an organisation that uses in-house DiffServ to divide its traffic into several classes.
  3. You use Windows for your desktop, but a Linux box for routing.

One problem with priorisation is that when you want to decide if a packet is to be prioritised or not you don’t have enough data, enough time, computational power or memory to do so. Routers are often small, very constrained embedded systems with few resources. But even if you use a full-grown Windows or Linux machine as a router some information about the data (like which program it was sent from) is already lost, since that information is not transmitted over the network.

So it is a good idea to label your packets at the origin and you can use cfosSpeed’s possibilities to accomplish that efficiently and very fine-grained (filter for programs, protocols, ports or manual filter expressions).

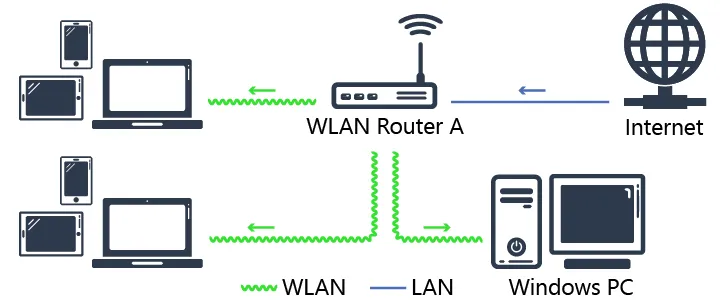
Here is how you do it. We assume that you have a Windows desktop whose traffic you want to prioritise (the “client”) and you have a router that routes your traffic (maybe among other traffic) to the Internet. Hopefully, that other traffic is also DS-labelled.

On your client you use cfosSpeed like everybody uses it and set up protocols, programs, etc. Furthermore, you set up some DSCP values. To do that click Start, programs, cfosSpeed, open console and enter “spd class”: you will see a listing of the traffic classes, like this:

    class highest -prio 100 -weight 400
    class higher -prio 90 -speed 40%,0 -weight 400
    class high -prio 80 -speed 40%,0 -weight 400
    class default -weight 100
    class low -prio 0 -speed 25%,-10 -weight 25
    class lowest -prio 0 -speed 25%,-30 -weight 6
    class drop

For each class you can set the DSCP value by the command “spd class C -dscp X” (sans quotes), where “C” is the class name and “X” is the DSCP value which is in the range of 0 and 63. The values are arbitrary, but 0 means “no DSCP set”. Other values might be in use in your organisation, ask your net admin. Make sure that class “highest” is sent out the fastest on your router and class “higher” still faster that “high”.

After you have set all the class values, a “spd class” might look like this:

    class highest -prio 100 -dscp 1 -weight 400
    class higher -prio 90 -speed 40%,0 -dscp 2 -weight 400
    class high -prio 80 -speed 40%,0 -dscp 3 -weight 400
    class default -dscp 4 -weight 100
    class low -prio 0 -speed 25%,-10 -dscp 5 -weight 25
    class lowest -prio 0 -speed 25%,-30 -dscp 6 -weight 6
    class drop

Now we have to switch off the traffic shaping on the client. Enter “spd set fixed 1;set txspeed 2g”. This will set the send speed to almost infinite, so no packets are queued locally.

On your router you can use the DSCP values to put the packets into the corresponding traffic class. Assuming the router uses cfosSpeed, you have to modify the filter settings to make use of the client’s DSCP values. Again (now on the router) click Start, programs, cfosSpeed, open console and enter “spd filter”. You will see a listing of all filter rules. It will contain some lines like this:

    18 rt-  -highest -c highest
    19 rt-  -higher -c higher
    20 rt-  -high -c high

Assuming the -highest filter is the first non-firewall filter and has number 18, enter the following commands:

    spd filter -I 18 -dscp 1 -c highest
    spd filter -I 19 -dscp 2 -c higher
    spd filter -I 20 -dscp 3 -c high
    spd filter -I 21 -dscp 4 -c default
    spd filter -I 22 -dscp 5 -c low
    spd filter -I 23 -dscp 6 -c lowest

This will sort all packets with DSCP values into the corresponding traffic queues on the router.

If you use some other system that Windows/cfosSpeed you have to find out how to use the DSCP value for routing. Under Linux iptables might be able to do that.

That’s it! All cfosSpeed settings made have been automatically saved and are active right away.

Additional comments:

DSCP tagging can be useful for load balancing as well. If you own a router that can utilise more than one Internet line at the same time, it might have a way to split the traffic on the various lines. A good solution might be to do DSCP tagging of traffic with cFosSpeed on the machine where the traffic originates and for the router to use the DSCP tags to send the traffic to one of the multiple lines to the Internet.

Links:

>RFC 2474—Definition of the Differentiated Services Field (DS Field) in the IPv4 and IPv6 Headers

>RFC 2475—An Architecture for Differentiated Services

>Wikipedia:Differentiated_services

Since version 2.02 gamer prioritize their games for data transmisson. The settings can be done by selecting »Options » Priorities at the cFosSpeed Kontextmenu.

>Add online games to our Priolist!

>cFosSpeed, the filesharing solution for P2P networks

Prioritizing indiviual ports

If you know the TCP/UPD source or destination port of your application, you can prioritize its traffic like this:
(edit the section [filter] at the settings.ini file)

TCP Ports

[filters]
; dest port=1234
filter=-tcp-dport 1234 -c high
; source port=5678
filter=-tcp-sport 5678 -c high

UDP Ports

[filters]
; dest port=1234
filter=-udp-dport 1234 -c high
; source port=5678
filter=-udp-sport 5678 -c high

>Manual for filter expressions.

How can I accelerate my online games?

Traffic Shaping technology does keep ping times low and transfer rates consistently high at the same time.

Still, to achieve optimal ping times, you should prioritize your game(s) as high as possible. You will find that we have already listed some of the currently most popular games under Program Settings. Should your game not be among the ones listed there, you can simply add it to the list.

A special case is the HTTP stream detection. If the detected protocol is HTTP, cFosSpeed tries to detect, if it is a video or audio stream. This works as follows:

If the user agent is one of the well-known players or has the substring “player” in it, cFosSpeed categorizes the connection as HTTP_STREAM_C or HTTP_STREAM_S. Otherwise if the content-type is audio or video it categorizes the connection as BSTREAM_C or BSTREAM_S. The BSTREAM_C/S connections are prioritized as “normal” so that the actual priority is determined by the program prioritization.

This allows you, for example in uncertain cases, to prioritize it according to your program use.

You can also let us know what online games you would like to have included on that list for future updates as well.

Please be careful to prioritize as few data and programs as possible in such a manner. This is because if you were to assign high priority to everything, you would be no better off than having nothing prioritized at all.

Alternatively, should the program name itself not be clear, you can also prioritize the ports used by the online game. If the TCP/UDP destination ports of an application are known, you can prioritize their data transfer as follows (by editing the [filter] section of the settings.ini file):

For TCP ports:
[filters]
; dest port=1234
filter=-tcp-dport 1234 -c high
For UDP ports:
[filters]
; dest port=1234
filter=-udp-dport 1234 -c high

After making those changes and saving them, the new settings still need to be loaded. This is done by opening the console (under Start, Program, cFosSpeed) and entering “spd reload”. Your changes will take (and remain in) effect after the next time you restart your system.

>cFosSpeed-Filter Manual (English)

Optimizing Connection Settings:

You can specify exactly what transfer medium you use under Connection Settings. The more information about a connection is available to cFos or cFosSpeed, the better ping times will be. Default is “Adaptive”. But if you were for instance using a DSL connection, you should select the appropriate DSL standard or protocol as your medium.

Favor Ping:

In addition, you can also use the settings in the context menu or status window to activate “Favor Ping”. A green arrow will then show up on the status window. This setting will have cFos or cFosSpeed do everything to keep ping times to a minimum but at the expense of transfer speed, which may slow down considerably.

Playing While Downloading:

If you are playing a game online without Traffic Shaping and run an upload or download at the same time, ping times to your gameserver will rise. Less data traffic means better (i.e., lower) ping. Especially with filesharing programs and other applications that send out lots of data, ping times often skyrocket resulting in serious lag. This will also slow down your in-game reaction time horrendously.

Traffic Shaping alleviates this problem by allowing filesharing and downloads to run in the background while gaming. This may still raise ping times minimally though. Therefore, we recommend you to keep “Favor Ping” activated at such times. By default, filesharing programs are set to very low priority. Now, this should not be taken to mean they are artificially slowed or even altogether stalled. What it does mean, however, is that such data will be briefly delayed when more important data like online game traffic needs to be transmitted. Only this priority scheme makes it possible to have filesharing programs run at maximum transfer rates while still using the same connection for other applications at the same time.

How to solve Internet congestion when many users share one Internet connection?

In restaurants, hostels, hotels, guest houses, on university campuses, office environments – whenever a lot of people share the same Internet connection – this Internet connection is often congested and the users experience up to several seconds of delay.

Here cFosSpeed can make a huge difference by prioritizing the traffic to and from the Internet. For example it can detect if a user uploads a bunch of photos or if some device downloads a big software update. cFosSpeed will slightly delay these big data uploads or downloads by reducing the bandwidth by about 1-2%. This reduces the ping time of the whole Internet connection, which allows highly responsive web browsing or even media streaming / VoIP phone calls and game traffic.

The usual state of most shared Internet connections.

This configuration will result in severe connection delays when some of the connected devices start massive up- or downloads, e.g. saving new photos or videos to cloud storage or downloading software updates. The problem can be solved by using the original router (Router A) for the Windows PC only and buying a cheap second WLAN router (WLAN Router B) for shared access.

The new configuration with cFosSpeed prioritizing the entire Internet traffic of the WLAN network.

To improve overall performance, you may want to install an additional Ethernet port on your Windows PC to connect to Router A. We always recommend to use cable connections, since they produce less latency than WiFi.

Extended configuration with cFosSpeed, second LAN connection for improved latency and an additional WLAN Router B2 to increase range.

Connecting the WLAN router

Connect the WAN port of WLAN Router B with the network port of the Windows PC

Setting up the Windows PC

number1

Install cFosSpeed, following the installation instructions

number2

Press the "Windows" key and type ncpa.cpl

number3

Click on the resulting control panel item entry

number4

Right-click on the network device you want to share. It is the one that connects the Windows PC to the Internet

number5

Click on "Properties"

number6

Click on "Sharing"

number7

Click on "Check the upper check box to enable connection sharing. You may want to uncheck the lower box, if it isn't already"

number8

Click on "OK"

number9

The Internet connection on this device is shared now

Note: Newer versions of Windows 10 have a bug which may stop Internet Connection Sharing from working after a reboot.

By using our freeware tool >cFosICS you can fix this.

Setting up the WLAN router

This particular instruction is for the ASUS RT-N12E, which we chose for its moderate price and easy setup. Nevertheless, this kind of connection sharing should work with any other WiFi access router available at your place.

number1

Connect to your router using an Ethernet cable or via WiFi. The router will show up as an open network (no password required) with the SSID ASUS_60. Now enter the router IP address (192.168.1.1) in the address bar of your browser to start setup

number2

Click on "Automatic Setting"

number3

Enter a Router Login Name and the New Password

number4

Click on "Next"

number5

Enter a new SSID (e.g. GuestWiFi) and a WiFi password

number6

Click on "Apply"

number7

The route will now display a screen showing the new WiFi configuration. You may want to write this down, because it will be needed to connect with the router from now on

number8

After reconnecting with the newly configured WiFi network, the router will show a page listing its current setup and connection status

Maybe the easiest way to prioritize a certain application is to use the programs / prioritization dialog. If this isn’t applicable you can create your own filter rule as follows:

First you have to determine which port your application uses and if it’s TCP or UDP. Use

      spd -tcpview

or the cFos / cFosSpeed connection overview dialog to find your application. Then you set up the filter as follows:

   filter=-tx -udp-sport / -udp-dport / -tcp-sport / -tcp-dport X -c classname.

You have to decide if it’s a source port or a destination port. In most cases there is a server on the Internet with a certain port, so it’s a destination port (dport). The filter rule would look like this:

   filter=-tx -udp-dport X -c classname      for UDP
      or
   filter=-tx -tcp-dport X -c classname      for TCP

where X is the server’s port and classname the class you want the traffic sorted into, e.g. high or higher (but never highest) if you want to increase the priority or lower / lowest if you want to decrease the priority.

Now insert this new filter rule into settings.ini, section [filters]. For UDP in most cases it should be at the top of the list of the other filter rules. For TCP it should rather be at the end. You can use “spd fstat” to see if your rule matched.

After changing settings.ini you need a “spd reload” command to let cFos / cFosSpeed reload the filter rules.

First cFosSpeed tries to detect the Layer 7 Protocol for each connection. If it is not detected (i.e. the protocol is UNKNOWN) or the priority of the detected protocol is “normal”, then the program detection is used to determine the priority.

A special case is the HTTP stream detection. If the detected protocol is HTTP, cFosSpeed tries to detect, if it is a video or audio stream. This works as follows:

If the user agent is one of the well-known players or has the substring “player” in it, cFosSpeed categorizes the connection as HTTP_STREAM_C or HTTP_STREAM_S. Otherwise if the content-type is audio or video it categorizes the connection as BSTREAM_C or BSTREAM_S. The BSTREAM_C/S connections are prioritized as “normal” so that the actual priority is determined by the program prioritization.

This allows you, for example in uncertain cases, to prioritize it according to your program use.

Prioritization – Your important streams first

You can adjust the priority of the most common network protocols, so all programs using it automatically have the right priority. In addition, you can configure the priority of individual programs. This means downloads don’t cause lag while gaming or viewing videos, for example.

Overview of connections / On-the-fly prioritization of connections

In one glance you see which programs use your bandwidth. cFosSpeed let’s you temporary change the priority to speed up transfers or reduce latency for time-critical applications.

1) Decrease priority
2) Increase priority

cFosSpeed stores its settings in the following files:

C:\ProgramData\cFos\cFosSpeed

  • data.ini
  • global.ini
  • settings.ini
  • user.ini

C:\Users\[username]\AppData\Local\cFos\cFosSpeed

  • user_data.ini

You can backup all 5 files.

In addition, if you want to keep the online budget log files you should backup the subdirectory logs: C:\ProgramData\cFos\cFosSpeed\logs.

To restore the settings just restore global.ini, user.ini, data.ini. Settings.ini is overwritten by new installations. Therefore if you also made changes in settings.ini, you need to apply these again in the new settings.ini. Otherwise use the settings.ini from the most recent installed version.

Thank You for using our Speed Guide!

This guide can either help you get the maximum out of your connection or solve problems with speed, ping time or connections.

No pings

cFosSpeed could not receive enough responses to it’s measurement pings. Please make sure your network equipment (firewall, router, etc.) allows ping responses, see Problems with Pings.

Is there traffic from other machines in your network?

If you have several PCs with cFosSpeed you can see the other computers by using the cFosSpeed Console.

C:\Program Files\cFosSpeed>spd ts

Make sure all PCs in the network have cFosSpeed installed. Also for speed tests, make sure only this computer sends/receives data.

Do you currently have control over the network usage for these tests?

Please make sure you have control over your network. Otherwise the speed and/or ping optimizations might be interfered by other PCs in the network.

Calibrate cFosSpeed optimally

Please make sure you have control over your network. Otherwise the speed and/or ping optimizations might be interfered by other PCs in the network.

Watch the video "How to calibrate your Internet connection"

(1/4) Click “Traffic Shaping > Calibrate line”

Then wait about 2-3 minutes until the status window indicates no or nearly no traffic.

Watch the video "How to calibrate your Internet connection"

(2/4) Now download with max. speed for at least 20secs.

Next upload with max. speed for 1-2 minutes. Repeat the upload 2-3 times.

Watch the video "How to calibrate your Internet connection"

(3/4) Open “Options -> Settings”

Watch the video "How to calibrate your Internet connection"

(4/4)

Hint: For the download and uploads you can also use our Speed Test page. Please ignore the values for download/upload speed from the Speed Test as long as cFosSpeed is not calibrated.

Can you calibrate cFosSpeed to 98% or above?

For the line calibration to work, cFosSpeed must receive Ping responses. Please check if “Pongs Received” in the adapter info is at least 50%.

If it is less than 50%, please have a look at our troubleshooting page Problems with Pings, otherwise you can Contact Us.

Speed too low

Traffic Shaping may cost 1-2% speed. This is a necessary consequence of the speed regulation for Traffic Shaping.

Test if the speed is also low with cFosSpeed uninstalled.

Is it still low?

If Yes, then it’s no cFosSpeed problem. In most cases the server you connect to may have speed problems.

Test if the speed is also low with Traffic Shaping disabled.

Is it still low?

The cFosSpeed network driver may cause this problem. Is your computer fast enough for your connection? Otherwise we would like to know about the problem.

Please send us an email, so we can have a closer look at your problem

Check the Low Latency Mode setting

Low Latency Mode active?

Try to turn it off in the cFosSpeed console:

C:\Program Files\cFosSpeed>spd gset latency 2 -save

If this helps, please let us know your network configuration by sending us an email.

Make two speed tests: download and upload. Each for 2-3 Minutes.

Do you get the raw max. speed of your connection?

cFosSpeed can not increase the raw speed of your connection. It cannot make a 11Mbit/s connection out of a 10Mbit/s connection.
cFosSpeed can improve your Internet connection whenever you have several connections at the same time, like a long email send and web-surfing, or filesharing and web-surfing.

Does the cFosSpeed prioritization work for you?

(1/6) cFosSpeed tries to keep your ping low. cFosSpeed Traffic Shaping should result in max. bandwidth (especially with several simultaneous connections) while having minimal ping times (in fact the ping time should be nearly the ping time you get when not transferring data at all). There may be a trade-off between low ping time and transfer speed. If you can live with a higher ping time, you can try this in the cFosSpeed Console:

For a higher upload speed:

C:\Program Files\cFosSpeed>spd set tx_delay
tx_delay = 10000

C:\Program Files\cFosSpeed>spd set tx_width
tx_width = 1000

Write down the two values.

(2/6) Now double each of them and try the following:

C:\Program Files\cFosSpeed>spd set tx_delay 20000
tx_delay = 20000

C:\Program Files\cFosSpeed>spd set tx_width 2000
tx_width = 2000

 If this doesn’t help, restore the old values.

C:\Program Files\cFosSpeed>spd set tx_delay 10000
tx_delay = 10000

C:\Program Files\cFosSpeed>spd set tx_width 1000
tx_width = 1000

(4/6)
For a higher download speed:

C:\Program Files\cFosSpeed>spd set tx_delay 10000
tx_delay = 10000

C:\Program Files\cFosSpeed>spd set rx_width
rx_width = 1970

Write down the two values.

(5/6) Now double each of them and try the following:

C:\Program Files\cFosSpeed>spd set rx_delay 40000
rx_delay = 40000

C:\Program Files\cFosSpeed>spd set rx_width 3940
rx_width = 3940

(6/6) If this doesn’t help, restore the old values.

C:\Program Files\cFosSpeed>spd set rx_delay 20000
rx_delay = 20000

C:\Program Files\cFosSpeed>spd set rx_width 1970
rx_width = 1970

Did this help?

There are (rare) cases when cFosSpeed RX shaping reduces the download speed.
To solve this problem try the following in the cFosSpeed Console:

C:\Program Files\cFosSpeed>spd gset rx_shape 0 -save

There are (rare) cases when cFosSpeed RX shaping reduces the download speed.
To solve this problem try the following in the cFosSpeed Console:

C:\Program Files\cFosSpeed>spd gset avoid_loss 0 -save

Did this help?

(1/2) Sometimes the speed measurements drifts over time because there is always an extreme amount of connections and a lot of UDP traffic. This can happen in some BitTorrent cases. Calibration works fine, but after a while the connections become slower and slower.

Only in such cases you can set the speed to fixed:
Get the current values by using the cFosSpeed Console:

C:\Program Files\cFosSpeed>6spd set maxtxacked
maxtxacked = 537274

C:\Program Files\cFosSpeed>spd set maxtxraw
maxtxraw = 537916

(2/2) Now choose a value between these two numbers and take 90% to 98% of it (510715 in this example).
Set it with

C:\Program Files\cFosSpeed>spd set fixed 1; set txspeed 510715
fixed = 1
txspeed = 510715

Pings too high

Is the Low latency Mode active?

Low latency Mode active?

Try to turn it on:

C:\Program Files\cFosSpeed>spd gset latency 1 -save

(1/2) Maybe the high ping times are caused by the server at the other end of the connection. This often happens with game servers. cFosSpeed cannot reduce your ping below the minimum which is determined by your connection / ISP. Whenever you use several connections simultaneously cFosSpeed can reduce the ping time and prioritize your traffic so that you get near minimum ping times while still using nearly all available bandwidth. This allow, for example, uploads / downloads during VoIP calls or online gameplay.
Uninstall cFosSpeed or disable Traffic Shaping

(2/2) Download hrping and – without any other traffic on your connection – try both Uninstall cFosSpeed or disable Traffic Shaping

C:\Program Files\cFosSpeed> hrping atlas-cfosspeed.com

C:\Program Files\cFosSpeed> hrping -u atlas-cfosspeed.com

Is the ping time still high?

Tip: For DSL connections use fastpath. WLAN typically has higher ping times as cable based networks. Mobile Internet may cause additional delay due to bad transfer conditions and/or congestion of the access point.Is there another PC in the network which sends/receives data?


Are your ping times good if this PC doesn’t use the internet?

You can limit this PC’s transfer rate. Install cFosSpeed on it and if this doesn’t help, limit this PC’s upload speed:

C:\Program Files\cFosSpeed> spd set tx_limit [value]

Maybe there is something wrong with the prioritization?
Please open “current connections” and check if each connection has the bandwidth it should have.

Is the prioritization correct?

Please change the setting for “Accommodate for Ping Jitter” in “Options > Settings > Preferences”

Is the ping time better now?

Some equipment interferes with TCP transmissions. For example some drivers for Atheros WLAN adapters may cause high pings with downloads. Please install the most recent network drivers. For a test, use another network adapter and see if pings times are still high during downloads.

New drivers / other network card helped?

Is your cFosSpeed set to fixed speeds? Check this by typing the following into the cFosSpeed Console:

C:\Program Files\cFosSpeed> spd set fixed
fixed = 0

It should be 0, except for rare cases with a lot of BitTorrent connections and high UDP traffic.

If your cFosSpeed line calibration remains stable, you should set it to 0:

C:\Program Files\cFosSpeed> spd set fixed 0

or use smaller values for the fixed speed (try reducing the speed in 1% steps).

Prioritization

(1/2) Prioritization can only work, if not all data is prioritized. It works best if only a little of the traffic is prioritized high and the rest normal. cFosSpeed sends out all packets as fast as possible. But (only) when there traffic with different priorities then higher prioritized packets are sent first. This is how you can test whether the prioritization scheme works:
Clear the current statistics

C:\Program Files\cFosSpeed> spd cstat -clear

Transfer data for some time

(2/2) Examine the newly created statistics

Microsoft Windows [Version 6.1.7601]
Copyright (c) 2009 MIcrosoft Corporation. All rights reserved.

C:\Program Files\cFosSpeed> spd cstat
tx shaping is active; txspeed = 10000, max_queue_size = 3,910,065

class highest -prio 100 -weight 400
  sent            8,433 ( 20%) packets        236,124 (  6%) bytes

class higher -prio 90 -speed 40%,0 -weight 400
  sent           22,285 ( 53%) packets        903,940 ( 25%) bytes

class high -prio 80 -speed 40%,0 -weight 400
  sent            8,443 ( 20%) packets      2,242,980 ( 62%) bytes

class default -weight 100
  sent            1,321 (  3%) packets         62,095 (  1%) bytes

class low -prio 0 -speed 25%,-10 -weight 25
  sent            1,096 (  2%) packets        132,167 (  3%) bytes

The traffic in all classes above “default” should be no more than 20%-40%.

Is it more than 20%-40%?

(1/2) See which connections consume bandwidth. Transfer data for a time and look at the current connections

(2/2) Is the protocol or program you want to prioritize set to “high” or “higher” and everything else to “normal” or lower? If not, open the prioritize protocol or program dialog (under “Options > Settings”) and adjust the settings. You can also add a program, if it is missing.

>Connection problems

Please check, if “Automatic MSS (MTU) optimization” is activated:

Some servers rely on a maximum MSS/MTU, so you can try to turn it off.

Also check if “Net Talk” is activated. You could try if it helps to turn it off.

Tweaks. How to squeeze the maximum out of your connection

(1/5) Please check if cFosSpeed is calibrated

Watch the video "How to adjust the Medium/Protocol for your Internet connection"

(2/5) Please set the medium to your connection type

(3/5) Activate “Accommodate for Ping Jitter”

(4/5) Activate “Packet loss avoidance”

(5/5) You may also try “Automatic MSS (MTU) optimization”.

In many cases a slightly lower MSS/MTU gains a few % of transfer speed. But some servers rely on a maximum MSS/MTU, so turn off “Automatic MSS (MTU) optimization” if you experience problems

How to check whether you benefit from cFosSpeed Traffic Shaping

cFosSpeed cannot increase the raw speed of your Internet connection. Also it cannot reduce your ping time below the minimum ping of your Internet connection. So you can only measure the benefits of Traffic Shaping during active data transfer which uses up your available bandwidth.

  1. Upload at full speed for 1-2 minutes
  2. Download at full speed for 1-2 minutes
  3. Do a combined upload and download at full speed

During all 3 scenarios, use hrping in the cFosSpeed Console to measure your ping.

C:\Program Files\cFosSpeed> hrping -t -u atlas-cfosspeed.com

Now try all 3 scenarios with and without Traffic Shaping

In all scenarios you should see a lower ping time with Traffic Shaping enabled. In scenario 3 you may also experience a higher download speed. The upload speed may be slightly reduced, because cFosSpeed needs the upload bandwidth to send the ACKs for the download fast enough.

Generating a Windows kernel memory dump

In case of a bluescreen while using our software we require a windows kernel memory dump to be able to look into the problem.

To generate the kernel memory dump please follow these steps:

To create the kernel memory dump adhere to the following settings of the function “kernel memory dump”

  • At “START/Control Panel/System” under “advanced” open the “startup and recovery – settings”
  • At “write debugging information” choose: “kernel memory dump”
  • By clicking “OK” confirm the changes and close the window “advanced”
  • By clicking “OK” confirm the changes and close the window “System” and then the window “Control Panel”
  • If you are using XP restart your computer (not required when using Vista or higher version!)

Now a kernel memory dump will be generated as soon as a bluescreen appears and unless otherwise specified saved as MEMORY.DMP.

Please archive your memory dump as a RAR or Zip file (we recommend RAR or 7-zip). Then send it to us by email at support@atlas-tech-solutions.com.

Contact us if need be to inquire about submitting large files.

How can I surf the Web faster?

Traffic Shaping technology does keep ping times low and transfer rates consistently high at the same time.

HTTP detection integrated in cFos and cFosSpeed serves to accelerate page loading times, especially during simultaneous uploads. Acceleration gains are higher the more individual elements need to be loaded on a given Web page.

Favor Ping:

If you are surfing a lot of pages (without major downloads), you may want to use the settings in the context menu or status window to activate “Favor Ping”. A green arrow will then show up on the status window. This setting will have cFos or cFosSpeed do everything to keep ping times to a minimum but at the expense of transfer speed, which may slow down considerably. However, depending on what application you are running, this may speed up loading Web pages even further.

Other Interactive Applications:

Both cFos and cFosSpeed come with integrated detection for major interactive applications like SSL, SSH, Telnet, IRC, and many others. This ensures low response times even during long uploads and downloads.

Should the standard priority scheme under Protocol Settings not be sufficient for your purposes, you can always prioritize any application either by name under “Program Settings” or add its port manually to the filter rules. This is especially advisable when running a server.

If the ports are known, you can prioritize their data transfer as follows (by editing the [filter] section of the settings.ini file):

 
For TCP ports:
[filters]
; dest port=1234
filter=-tcp-dport 1234 -c high
; source port=5678
filter=-tcp-sport 5678 -c high
For UDP ports:
[filters]
; dest port=1234
filter=-udp-dport 1234 -c high
; source port=5678
filter=-udp-sport 5678 -c high

After making those changes and saving them, the new settings still need to be loaded. This is done by opening the console (under Start, Program, cFosSpeed) and entering “spd reload”. Your changes will take (and remain in) effect after the next time you restart your system.

>cFosSpeed-Filter Manual (English)


Surfing and Filesharing (P2P):

By default, filesharing programs are set to very low priority. Now, this should not be taken to mean they are artificially slowed or even altogether stalled. What it does mean, however, is that such data will be briefly delayed when more important data is being transmitted. Only this priority scheme makes it possible to have filesharing programs run at maximum transfer rates while still using the same connection for other applications (like surfing the Web) at the same time.

Optimizing Connection Settings:

You can specify exactly what transfer medium you use under Connection Settings. The more information about a connection is available to cFos or cFosSpeed, the better ping times will be. Default is “Adaptive”. But if you were for instance using a DSL connection, you should select the appropriate DSL standard or protocol as your medium.

Enable>cFos Traffic Shaping for smartphones, tablets and other mobile devices.

Overview of the cFosSpeed menu (context menu)

Windows 7, 8 and 8.1 allow you to use your Wi-Fi adapter as an ad hoc Wi-Fi access point. So other devices can connect to your PC (instead of directly to the Wi-Fi router) and therefore can benefit from cFosSpeed Traffic Shaping.

Configuration of the cFosSpeed Wi-Fi access point

cFosSpeed now has a context menu option to start and configure (or stop) the Wi-Fi access point easily.

If your PC is connected to the router via Wi-Fi, you can share the same adapter for the ad hoc Wi-Fi access point. Or you can use the Wi-Fi adapter exclusively for the Wi-Fi access point if your PC is connected to the router via network cable. In this case the Wi-Fi bandwidth is fully available for your mobile devices, like smartphone or tablet.

When you have cFosSpeed installed on this PC, the Wi-Fi data is routed through cFosSpeed and, via its Layer-7 protocol detection, cFosSpeed can prioritize the traffic. If you frequently use smartphones and tablets for VoIP or streaming traffic, like music or movies, we recommend to add a Wi-Fi adapter to your PC and route the traffic of your mobile devices through this PC and cFosSpeed.

Manually set up a Wi-Fi access point (Windows 7 and above)

Open the command shell as Administrator:

C:\Program Files\cFosSpeed>netsh wlan set hostednetwork mode=allow

Open the command shell as Administrator:

C:\Program Files\cFosSpeed>netsh wlan set hostednetwork ssid=”cFos Wi-Fi” key=”your_password” keyUsage=persistent

Check with:

C:\Program Files\cFosSpeed>netsh wlan show hostednetwork

Start “Microsoft Virtual WiFi Miniport Adapter”.

C:\Program Files\cFosSpeed>netsh wlan start hostednetwork

Check with:

C:\Program Files\cFosSpeed>netsh wlan show hostednetwork

In the list of network connections the red cross next to “Microsoft Virtual WiFi Miniport Adapter” should have been disappeared.

Right click in the list of network connections on the active Internet connection and select “Properties” from the menu. Click the “Sharing” tab, and then select the “Allow other network users to connect through this computer’s Internet connection” check box.

Under “Home networking connection” select the connection that shows the “Microsoft Virtual WiFi Miniport Adapter” in the list of network connections.

Confirm with “OK”.


All cFosSpeed versions do come with their own standard skins. Still, you are free to modify and change them to better suit your own needs and aesthetic preferences. In fact, we strongly encourage you to send us your own custom designs and share them with others!

This tutorial will guide you through the process of creating a new basic skin. Do note that most of the graphics used for this are already part of your cFosSpeed distribution, which is why the focus will be on teaching you several ways to integrate them into your own design.

Hint: When working on your skin, you may want to activate the cFosSpeed “test mode.” This will provide you with a quick and easy way to check if everything is working properly and in the right place.

(See the skin definition reference for details on skin testing.)

The INI file / [all] section

The INI file is a plain text file that determines how cFosSpeed displays status information on screen. Let’s just name ours skin.ini and save it to MySkin, a new folder we should first create as a subdirectory of the cFosSpeed main directory (e.g., C:\Program Files\cFosSpeed\MySkin). The new INI file must contain an [all] section listing version information, a skin name and background definition, much like the one shown below:

[all]

version=cFosSkin V1.0

name=MyFirstSkin

background=back.bmp

background_mask=backmask.bmp

Since there is only one version number at this point (V1.0), we’ll just go ahead and use it.
The skin will show up later in the program’s context menu under “Select Skin” by the name given to it in the second entry above.
The background for this skin is built from a simple square image filled with a color gradient (back.bmp) and a grayscale mask defining the skin’s actual shape (backmask.bmp).
For each individual pixel, the grayscale value of the background_mask determines the alpha value (i.e., opacity) of the resulting skin background, whereas the actual color information is taken from the background image. In the mask, black (0) denotes total transparency, while white (255) means full opacity.

If you get a chance to work with 32-bit *.TGA or *.BMP files, you can achieve the same result more easily by using a single image for both color and alpha information. In this case, all mask information is taken directly from that image, meaning there’s no need to define a separate background_mask section. For additional background-definition techniques, please refer to our skin definition reference page.

What we’ll do now to add some eye candy is have the skin blend in and out when it is being started. We’ll also take this opportunity to define a global R,G,B transparentcolor:

blend_time=300

blend_out_time=500

transparentcolor=255,0,0

transparentcolor value doesn’t really need to be specified here, but doing so may help during skin creation by making it easier to check which pixels of an image are fully transparent. Remember that it remains valid for all the images we’ll use as part of this skin.

The font definition

Skins usually contain several text sections for conveying alphanumeric status information. The required parameters are typically entered individually for each respective section. However, there are some parameters that do depend on the font image chosen for a section rather than the section itself. Since such parameters are the same for all sections using a particular font image, it would be redundant – even nonsensical – to repeat them over and over again for each section. Thus, for the sake of economy, we use a font definition to write them down once and then refer back to this section as needed:

[font1]

fontbitmap=num_chars3.tga

framewidth=5

frameheight=8

fontbitmapchars=0 123456789KMGT.?

In this section, font1 is the name of the font. This will come into play later on when it’s used to assign that font to different text sections.
The fontbitmap is the bitmap containing the font image. For this tutorial, we chose a font that is part of the cFosSpeed “Numerical” skin and can either be found in the default_skin subdirectory of your cFosSpeed installation (e.g., C:Program FilescFosSpeeddefault_skin) or downloaded from here(unzip).

It contains a small frame for every character listed after fontbitmapchars – aligned from top to bottom.
Each frame is as wide and high as defined under framewidth and frameheight, respectively.

Note that the space (i.e., the “blank” character) should not be put at the beginning or end of the character list, as the program would not recognize it there.

And don’t worry about the “?” not being properly displayed – this is just a dummy we’ll later use to format text output.
There are also a lot of other advanced text definition methods available on our skin definition reference page.

The animation method

Now, we are ready to add the first graphical disp section to our skin. Let’s start with an animation. This method uses an image consisting of multiple frames, where the value of the assigned parameter determines which frame is being displayed at any given time. This new section will indicate incoming data traffic by moving a bullet each time a packet is received. For this purpose, we’ll use the rx_bullet.tga(unzip) image from the cFosSpeed “Liquid Crystal” skin:

[disp1]

value=rx_data_cnt

method=animation

rect=44,41,55,59

bitmap=rx_bullet.tga

mod=14

min=0

max=13

frames=14

The bitmap contains 14 frames to comprise a complete up-and-down cycle that can be run indefinitely. Because the rx_data_cnt parameter is a simple counter (meaning it will increase continuously while cFosSpeed is running), we’ll need to perform a mod(ulo) calculation to keep the value within the range of min and max.

Positioning the motion is done by setting rect to the coordinates of the frame’s upper left corner and to those of a pixel just right of and below the frame’s lower right corner (both shown bright red in the magnified part of the sample image).

If we want a similar display for outgoing packets, this can be accomplished simply enough by copying this section and changing the disp name along with the value and rect entries:

[disp2]

value=tx_data_cnt

method=animation

rect=44,58,55,76

bitmap=rx_bullet.tga

mod=14

min=0

max=13

frames=14

What we have now are two displays representing two different parameters but still looking the same. We can improve on this design by making use of the transform key. One of the most powerful assets the skin definition language has to offer, this key permits mapping one color range to another (the correct notation for each range is Hue, Saturation, Value). Thus, source and destination range would have to be combined into one comma-separated list like this: Range1_Hue_StartRange1_Sat_Start , Range1_Val_StartRange1_Hue_EndRange1_Sat_End , Range1_Val_EndRange2_Hue_StartRange2_Sat_Start , Range2_Val_StartRange2_Hue_EndRange2_Sat_End , Range2_Val_End.

So, adding

transform1=15,0,0,40,255,255,100,0,0,120,230,210

to the parameters above would transform the color from orange to green, while also reducing saturation and brightness.

The history method

For displaying incoming connection speed (rx_speed) as a bar graph, we’ll need another animation. Since it contains a 26-frame animation, the rx_bar.tga(unzip) image from the cFosSpeed “Liquid Crystal” skin lends itself particularly well to this.
Keep in mind though that the parameter here may change very rapidly, which could cause the animation to behave slightly erratically. So, we’ll have to smooth things out a bit. This can be accomplished with the history method. Not only does it offer a number of ways for displaying the progression of a value (consult our skin definition reference for a more detailed description), but it can also be used to calculate and display the arithmetic mean of the values a parameter assumes over any given time period.

[disp3]

value=rx_speed

method=history updatetime=240

historysize=1

hdisp1=rx_speed_disp

You may have noticed there is no bitmap but a hdisp1 entry instead. This is because the history method can handle multiple display sections for rendering value progression. These are defined as hdisp1,…,hdispN and can be used to create effects like the scrolling bar graphs of the moving fish-shaped packets of the cFosSpeed “Default” skin. For this bar graph, however, only one such section is needed.  It should be given its own name though (to distinguish it from regular disp sections). Note that there is no need to enter a value here, because the value in the history section will be used for this section as well.

[rx_speed_disp]

method=animation

rect=54,41,108,59

bitmap=rx_bar.tga

min=0

max=100

frames=26

The min and max values define the range of the rx_speed parameter, which is best thought of as the percentage of available bandwidth.

Again, adding a similar display for the speed (tx_speed) of outgoing connections can be done simply by copying the previous sections, changing disp name, value and rect entries, and applying the same color transformation as for the tx_packet.

[disp4]

value=tx_speed

method=history

updatetime=240

historysize=1

hdisp1=tx_speed_disp


[tx_speed_disp]

method=animation

rect=54,58,108,76

bitmap=rx_bar.tga

min=0

max=100

frames=26

transform1=15,0,0,40,255,255,100,0,0,120,230,210

The text method

As great as a spiffy graphical display is, it often makes sense to have some more specific information displayed about a parameter’s current value as well. This is where the text method comes in handy (using the font definition we drew up earlier). Let’s say, for instance, we want to have incoming CPS shown as a numeric value. Then, we would have to add the following section:

[disp5]

value=rx_cps

method=text

font=font1

rect=50,32,80,40

style=d

flags=r

digits=6

decimals=1

unitchar=?

transform1=60,0,0,60,255,255,33,0,0,33,220,255

transform2=0,0,0,10,255,255,225,190,140,226,191,141

What this does is display the rx_cps parameter of cFosSpeed, which keeps track of the current CPS reception rate. By setting method to text and font to font1, we make sure the disp section uses the font we’ve already defined in step two.
The style is set to “d” (=decimal) with one digit after the comma. Setting the “r” flag will have the text right-aligned. Numeric value and measuring unit may take up to 6 digits. Seeing then how our font definition clearly specifies each digit to have a width of 5 and a height of 8 pixels, this would result in a rect of 30×8 pixels to be placed above the bar defined in [disp3].

Having the unitchar point to a “blank” character bitmap will prevent displayed numbers from shifting to the right when there is no measuring unit available. This happens when transfer rates fall outside available (T)era, (G)iga, (M)ega or (K)ilo byte ranges (e.g., when showing bytes only).

While transform1 shifts the color of the text from yellow to orange, transform2 decreases the intensity of the drop shadow, which is also part of the font bitmap.

For outgoing CPS, let’s now add the following:

[disp6]

value=tx_cps

method=text

font=font1

rect=50,77,80,85

style=d

flags=r

digits=6

decimals=1

unitchar=?

transform1=60,0,0,60,255,255,100,0,0,100,200,220

transform2=0,0,0,10,255,255,225,190,120,226,191,121

It should be obvious by now that this is basically the same as above – just with other rect coordinates. What’s also different here is that the transform1 key changes the color to green, while transform2 creates a slightly darker shadow.

The slider method

What we are going to do now is add a little LED-like display emitting a brief flash when changing states. Let’s just go with the led_green.bmp .

[disp7]

value=latency

method=slider

rect=111,50,117,56

bitmap=led_green.bmp

scale=2

stepsize=1

frames=3

min=0

max=2

updatetime=200

transform1=170,0,0,205,255,255,224,0,0,225,255,150

transform2=0,0,0,10,255,255,225,190,140,226,191,141

This section displays the value of the latency parameter (see our skin definition reference page), which can either be 0 (low latency is off) or 1 (low latency is on). With scale set to 2, the original parameter is projected onto a range from 0 to 2. In combination with stepsizeframesmin and max, this will have the animation run through all of its three frames each time the original value changes from 0 to 1. Animation speed is controlled by the value entered for updatetime, which determines the time each frame is shown in milliseconds.

Color transformations are used here to correct some minor glitches in the original bitmap’s shadow colors.

The activearea method

An activearea acts as a switch that can be put to a number of uses (see the skin definition reference page). It can, for instance, be used to start a program, open a URL, or toggle other disp sections’ visibility. And this is exactly what we’re going for here.

Let’s use the switch.tga(unzip) from the cFosSpeed “Default” skin, as it comes with “inactive”, “clicked” and “mouseover” states already in place.

[disp8]

method=activearea

bitmap=switch.tga

rect=110,58,119,65

action=toggle

target=disp7

blend_time=250

To have this section toggle the visibility of another, we first need to set action to “toggle” and target to the name of the section we want to control. Having the activearea fade in and out, as the mouse cursor enters or leaves it, can be done simply by assigning a value to blend_time (in milliseconds).

The motion method

motion is an animation that is being played for as long as the assigned value stays within a certain range. Let’s use tcp3.tga from the cFosSpeed “Liquid Crystal” skin for displaying active TCP connections.

[disp9]

value=tcp_cnt

method=motion

bitmap=tcp3.tga

rect=30,13,46,30

min=1

idleframe=1

transform1=225,0,0,230,255,255,10,0,0,15,255,255

What this does is use the tcp_cnt parameter of cFosSpeed, which tracks the number of current TCP connections, while setting the min value to “1.” In other words, it will become active whenever one or more TCP connections are open.

The bitmap contains two frames. The first is completely transparent (i.e., filled with transparentcolor). This frame serves as the idleframe, meaning it will be displayed when the tcp_cnt is “0” and thus falls outside the range between min and max. Note that for what we’re trying to accomplish in this step, we can skip defining max altogether, because there is really no need to specify an upper limit here.
By contrast, the second frame is the image that will be shown if the tcp_cnt is “1” or more.
To make sure the motion stands out nicely from the background, we use transform1 to change its color from blue to red. And for providing precise numeric information, we also add a small text section displaying the number of active TCP connections.

[disp10]

value=tcp_cnt

method=text

font=font1

rect=46,21,61,29

style=n

digits=3

flags=br

transform1=50,0,0,70,255,255,50,0,0,70,230,220

transform2=0,0,0,10,255,255,225,190,140,226,191,141

Now, let’s do something a little more ambitious by adding the following motion:

[disp11]

value=ping_time

method=motion

bitmap=connect.bmp

rect=35,87,48,99

min=1

idleframe=1

updatetime=120

pause=2000

transform1=205,0,0,212,255,255,225,0,0,227,255,220

transform2=0,0,0,200,255,255,0,0,0,200,200,200

This one (connect.bmp ) contains seven rather than just two frames. Again, the first is a fully transparent idleframe.
The other frames compose an animation that is being played continuously while ping_time stays above zero. To control animation speed, updatetime is set to 120 ms. What we’ve also done is add a pause of 2,000 ms after each time the animation has run through (i.e., after its last frame finished playing).
Transformations are again used here to handle some problems with the original bitmap’s shadow colors.
For conveying accurate numeric values, we’ll again need a brief text section like the one below:

[disp12]

value=ping_time

method=text

font=font1

rect=50,87,65,95

style=n

digits=3

flags=br

transform1=50,0,0,70,255,255,200,0,0,201,64,255

transform2=0,0,0,10,255,255,225,190,120,226,191,121

Note that both text sections contain a “b” flag. What this does is make those sections empty (and thus invisible) while their value is zero.

The fader method

Now that the display is complete, there’s only one thing left for us to do – see to it that elements still remaining visible even when the status window is not in the “open” state (cFosSpeed: the network port is closed) disappear from the display. This is where we can employ the fader method provided by cFosSpeed:

[disp13]

value=open

method=fader

min=0

max=1

min_alpha=0

max_alpha=255

blend_time=1000

target=disp1,disp2,disp5,disp6,disp7

This fader changes the alpha value of all sections listed under target depending on the state of the “open” parameter – with min and max delimiting the range that activates the fader.
Initial and final alpha values for the fading process are set by min_alpha and max_alpha, respectively, while blend_time determines the duration of the fading process.

So, we now have a totally empty background when the program starts and no network connections are active.

This is the end of our short tutorial on how to create a cFosSpeed skin. Still, there are lots of additional options available for each method to further adapt your skin to your own individual needs and aesthetic preferences. Much more information on this is available on the skin definition reference page.

Have fun designing your own skins! 🙂

Scroll to Top